Payer Maintenance

Contents  Previous  Next

After using ClaimStaker to monitor claim rejections and denials for a month or so, you may find you need to adjust the edit configuration for a few specific insurance companies (payers) instead of using the more general edit configuration by claim type. These specific payers will become your "working payers." Your list of working payers is created by selecting individual payers from the master payer list, which is available via the Add Payers to the Working Payer List page. Where the master payer list contains the name of almost every payer in the nation, the working payer list you create should only contain payers for which you cannot adequately control the edit configuration by claim type alone.

Edits can be enabled or disabled for any payer in your working payer list. You can also create user inclusions or user exclusions to medical necessity edits for any individual payer as well as National Correct Coding Initiative (CCI) exclusions. If the edit configurations alone do not meet your needs, you also have the ability to create your own user defined edits to include a specific payer without having to add the payer to your working payer list.

To reach the Payer Maintenance page, from the ClaimStaker toolbar, select Configuration then Payer Maintenance. A list displays any working payers already created.

The Payer Maintenance page provides the information listed below for each payer. Payers are initially sorted by payer name, but to make accurate selections easier, they can also be sorted by payer ID, payer (claim) type, or clearinghouse by selecting the appropriate column header.

Adding working payers

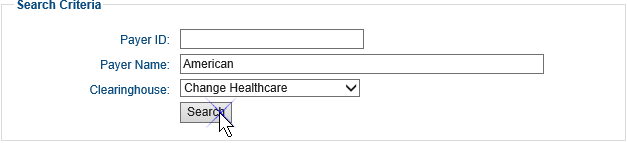
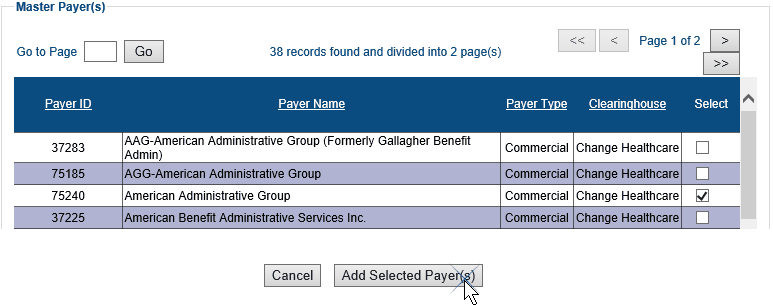
The Add Payer(s) to Working Payer List page is accessed only from the Payer Maintenance page. It is divided into two sections: Search Criteria and Master Payer(s). The Search Criteria section is used to locate specific payers in the Master Payer(s) section of the page. The Master Payer(s) section lists all payers.

IMPORTANT: When selecting your working payers, it is important to select the correct payer entry for the specific clearinghouse. It may seem that all clearinghouses use the same payer IDs, but that is not always the case (see example below). When claims are created in your billing system, the payer ID is included to identify the specific insurance company the claim will go to, and a claim filing indicator (or financial class) identifies the claim type (e.g., BC/BS, Medicare, commercial, etc.). This payer ID/claim type combination is used to select which ClaimStaker edit configuration is applied to the claim.

Screenshot of Search Criteria section of the Payer Maintenance Page. There are three fields. The Payer ID field is empty. The Payer Name field has American entered. The Clearinghouse field has Emdeon selected from the drop-down list. The Search button is being selected.

To reach the Add Payer(s) to Working Payer List page and add a new working payer:

  1. From the Payer Maintenance page, select Add Payer(s). This takes you to the Add Payer(s) to Working Payer List page.

  2. Search for the specific payer you wish to add by entering their payer ID in the Payer ID field or their name in the Payer Name field. If you are unsure of the exact name or payer ID, typing in a partial entry will pull up all payers that contain those characters and allow you to browse and narrow down your search. Select a clearinghouse from the Clearinghouse drop-down menu to limit your search to payers for that particular clearinghouse, and then select the Search button.

    Screenshot of Search Criteria section of the Payer Maintenance Page. There are three fields. The Payer ID field is empty. The Payer Name field has American entered. The Clearinghouse field has Emdeon selected from the drop-down list. The Search button is being selected.

  3. Payers meeting the search criteria appear in the list in the Master Payer(s) section of the page. The list may cover multiple pages depending on the number of payers found. You can move forward and backward between pages using the arrow buttons at the top-right portion of the screen or go to a specific page by typing the page number in the Go To Page box.

    Payers are initially sorted by payer name in ascending order, but can also be resorted by selecting the link in the Payer ID, Payer Name, Payer Type, or Clearinghouse column header. Once the desired payers are found, select them by enabling the check box in the Select column for each payer and selecting the Add Selected Payer(s) button.

    Screenshot of Master Payer list table with four columns and five rows. The check box under the Select field for the American Administrative Group payer is checked/enabled. The Add Selected Payer(s) button is being selected. There is information at the top of the page indicating the number of records found. Here, it says forty records found and devided into two pages. There is also a Go to Page field at the top of the page with a Go button next to it where a specific page number can be typed in. There are forward and backward arrow buttons also for moving between pages.

  4. You are presented with a message that the payer was successfully added and the new payer appears at the bottom of the list of working payers on the Payer Maintenance page. It is recommended that you double-check the payer ID to verify the correct payer was added.

Deleting working payers

NOTE: Removing a working payer from the working payers list also removes any special edit configuration for that payer and removes the payer from any medical necessity exclusions and/or inclusions in which it was included.

To remove working payers:

  1. From the Payer Maintenance page, locate the payers to be removed from the list of working payers by locating the payer in the Payer ID or Working Payer Name column.

  2. Select the check box(es) under the Delete column for the payers to be removed and then select the Delete Payer(s) button at the bottom of the page.

    Screenshot of the Payer Maintenance table. The check box under the Delete column has been selected for working payer, Physicians Corporation of America. The Delete Payers button is being selected.

  3. A message appears indicating the payer was successfully deleted and the payer no longer appears in your list of working payers.

Copyright © 2022 Alpha II, LLC. All Rights Reserved. Contains Alpha II, LLC, Confidential and Proprietary Information.
UB-04 Data Specifications, 2022, is Copyrighted by American Hospital Association (AHA). All Rights Reserved.
CPT Copyright 2021 American Medical Association (AMA). All Rights Reserved. CPT® is a Registered Trademark of the AMA.