The User Defined Edit Maintenance page provides a means for you to create specific edits you wish to appear in your audit results. Because of its ability to create user defined edits, ClaimStaker is a dynamic tool for both editing purposes and for periodic auditing for compliance.
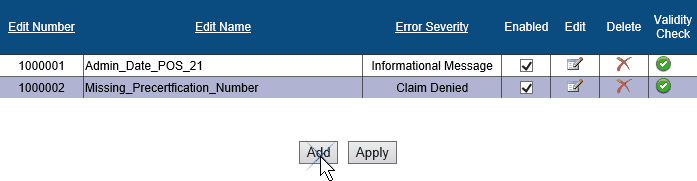
To reach the User Defined Edit Maintenance page, from the ClaimStaker toolbar, select Configuration, then User Defined Edit Maintenance. You are presented with a list of any previously-created user defined edits. To make locating a specific edit easier, the edits can be sorted by edit number, edit name, or edit severity by selecting the appropriate column header.
Adding a user defined edit
In this section, we will walk through adding a basic user defined edit. We will create an edit that displays an edit message when an invalid CPT code is used for a specific payer. To do so:
- Select the Add button at the bottom of the User Defined Edit Maintenance page. This takes you to the Add User Defined Edit page.
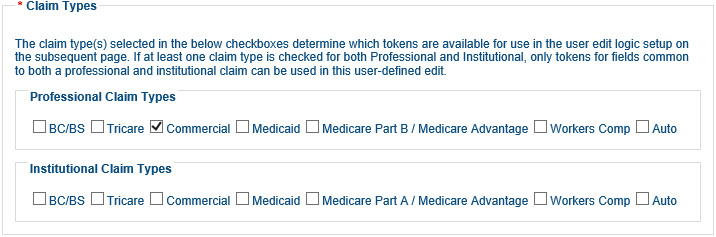
- Under the Claim Types section of the Add User Defined Edit page, select the check boxes for the desired professional and/or institutional claim types for your new edit.
NOTE: Tokens available for selection are based on the selected claim type (e.g., only tokens applicable for the professional claim type will display when the professional claim type is selected. If both professional and institutional claim types are selected, only tokens for data elements available under both claim types are displayed).
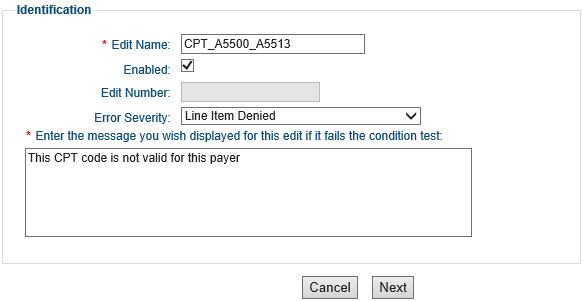
- In the Identification section, enter the name of the new edit in the Edit Name field. Select the Enabled check box if you want the edit to be enabled upon creation (the box is checked by default). The edit number will automatically be assigned the next sequential number available upon creation of the edit, which is why you cannot enter information into the Edit Number field. If you want to change the severity of your edit, select it from the Edit Severity drop-down menu. Add an edit message in the Enter the edit message... text field. Select the Next button when finished to advance to the Add User Defined Edit Logic page.
NOTE: The edit name cannot contain special characters and cannot begin with a number.
In this example, we are designating a commercial claim type, naming the edit "CPT_A5500," setting it to be enabled, selecting the appropriate error severity level, and entering an edit message. Then we select the Next button to proceed to the Add User Defined Edit Logic page.
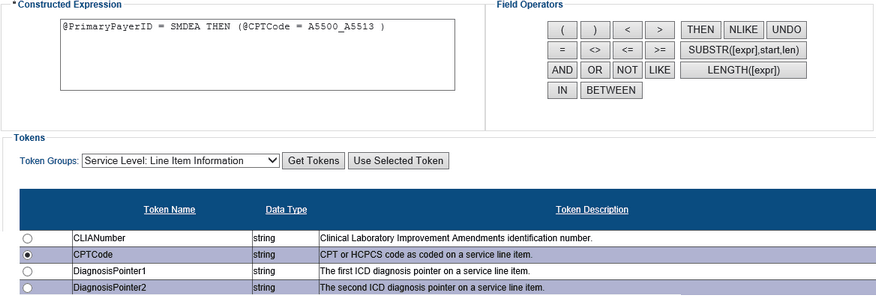
- Next, we create the logic for the new edit "CPT_A5500" edit we are creating. The User Defined Edit Maintenance page is divided into three sections: the Constructed Expression section, the Token section, and the Field Operators section.
To begin creating the edit:
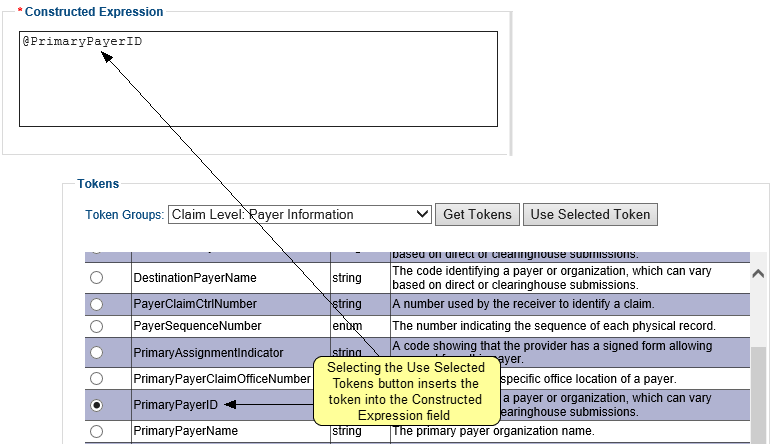
- Under the Tokens section of the page, select the Claim Level: Payer Information group from the Tokens Group drop-down menu and select the Get Tokens button. (To make creating the constructed expression easier, tokens are organized into File Level, Batch Level, Claim Level, and Service Level groups.)

- Once the token group is selected, its applicable tokens appear in the Token Name column of the table just below the Token Groups drop-down menu. To make determining the correct token easier, a description of each token is displayed in the Token Description column of the table. Select the token you wish to add to your user defined edit by selecting its radio button then selecting the Use Selected Token button. The token appears in the Constructed Expressions section of the page, which is the working area for building your user defined edit. Each selected token is preceded by an @ symbol.
For this example, we want to create the edit to display when the CPT code is invalid for a particular payer, so we select the PrimaryPayerID token. When we do, it displays with an @ symbol in front of it in the Constructed Expression section as shown below.
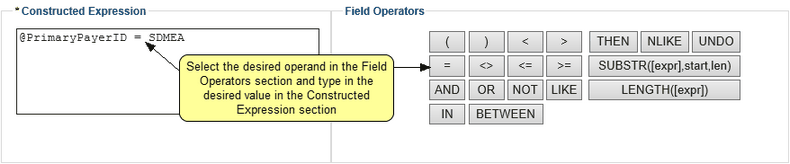
- Next, we use the operand keys in the Field Operators section of the page to designate how the data value should be identified for the edit, then type in the desired value into the Constructed Expression section as shown below.
Since we are specifying a particular payer in our example, we want to make the token equal to the payer ID. In this case, "SDMEA" is the payer ID. So we select the equal sign (=) button from the Field Operators section of the page, which inserts it after the @PrimaryPayerID token in the Constructed Expression section. Then we type in the payer ID (SDMEA) after the equal sign.
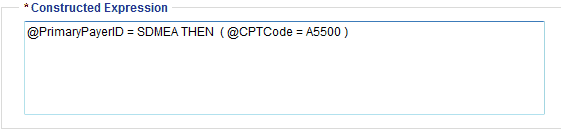
- Continue this using required operands and information until you have finished creating your user defined edit (in this case, adding CPT code A5500). Then select the Apply button to save it. A message appears indicating the edit was successfully added and it displays in the list of edits on the User Defined Edit Maintenance page.
Validating a user defined edit
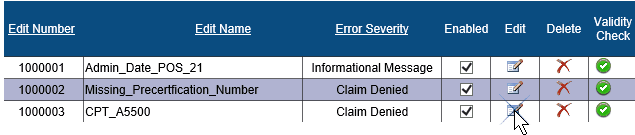
The Validity Check column indicates whether or not there is an issue with a user defined edit. A green circle icon indicates the edit successfully compiled and is ready for use by the claim scrubber engine. A yellow triangle icon indicates an issue with either the tokens used in the edit or with the compilation of the edit.

It is possible to enable an edit that does not pass the validity check. An edit that is enabled (checked in the Enabled column), indicates a user has flagged the edit for inclusion in the claim scrub process. However, an edit must also pass the validity check in order to be used by the claim scrubber engine.
If there is an issue with a user defined edit, a message box will appear at the top of the User Defined Edit Maintenance page or User Defined Edit Logic page stating "unable to compile. Contact your support team for assistance.
Modifying a user defined edit
The example below describes how to modify the user defined edit we added in the example above. We are adding a CPT code to the edit and changing the name of the edit to include that CPT code. To modify a user defined edit:
- From the User Defined Edits page, select the edit to be modified by selecting the Edit icon in the Edit column. The edits are initially sorted by edit number, but can be resorted by selecting the link in the Edit Number, Edit Name, or Edit Description column header. Selecting the link takes you to the Modify User Defined Edit Maintenance page.
- Under the Claim Types section of the Modify User Defined Edit page, you can modify the professional and/or institutional claim types for your new edit by checking or unchecking the appropriate check boxes.
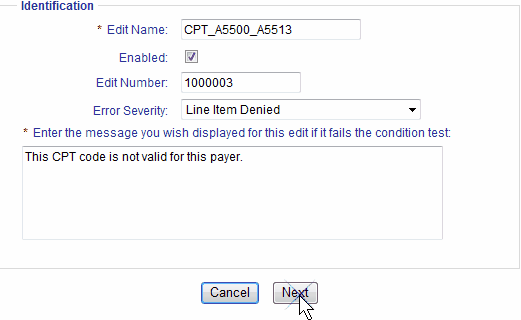
- In the Identification section, you can modify the name of the edit in the Edit Name field. Select the Enabled check box if you want the edit to be enabled upon creation (the box is checked by default). The edit is already assigned a number that can't be changed, which is why you cannot enter information into the Edit Number field. If you want to modify the severity level, select it from the Edit Severity drop-down menu. Modify the edit message in the Enter the edit message... text field. Click the Next button when finished to advance to the Add User Defined Edit Logic page.
In this example, we are adding a second CPT code to the edit name, so we enter it in the Edit Name field and select the Next button to proceed.
- Changes to the edit logic can be made from the Modify User Defined Edit Logic page.
- To change the token group, select the desired token group from the Token Groups drop down menu and select the Get Tokens button. (To make creating the constructed expression easier, tokens are organized into File Level, Batch Level, Claim Level, and Service Level groups.)
- To add a new token, select a token for the specified token group from the table in the Tokens section and select the Add Token button. This will add the new token to the end of the logic string in the Constructed Expression section of the page (it can be moved if needed). To make determining the correct token easier, a description of each token is displayed in the Token Description column of the table.
- Use the operands in the Field Operators section to apply desired calculations to the user defined edit. Operands allow you to indicate whether you want the field to be equal to, greater than, or less than a value.
- Type in the desired value for the edit in the Constructed Expression section. In our example, the only change we are making is to add a second CPT code, A5513, so we add it to the Constructed Expression section as shown below.
- When all changes are complete, select the Apply button to save them. A message appears indicating the edit was successfully modified and the edit displays in the list of edits on the User Defined Edit Maintenance page.
Deleting a user defined edit
To delete a user defined edit, from the User Defined Edit Maintenance page, locate the edit to be deleted and select the red "X"
icon for that edit under the Delete column. Select OK to confirm deletion when prompted.

A message is displayed stating the edit was successfully deleted and it no longer appears in the list of user defined edits.
Copyright © 2022 Alpha II, LLC. All Rights Reserved. Contains Alpha II, LLC, Confidential and Proprietary Information.
UB-04 Data Specifications, 2022, is Copyrighted by American Hospital Association (AHA). All Rights Reserved.
CPT Copyright 2021 American Medical Association (AMA). All Rights Reserved. CPT® is a Registered Trademark of the AMA.